 |
Class Notes:
Lighting Seminar
Arlington, VA
August 21, 2002
Kevin Johnson
Tom Musto is a 20-year veteran of Film and Video, and has been a Director of Photography on Documentaries, TV Commercials and Features. His seminar, "Lighting for Video Film Style," breaks down the basic principles of lighting and photography, and then builds on them with techniques for simple but effective lighting.
As Tom put it... modern cameras are sold on the marketing campaign that "they are so light sensitive, you don't really need light."
"Well," says Tom, "we don't need to wear clothes, but we choose to..."
While many in the business are talking about FILM LOOK, Tom teaches FILM STYLE. In other words, it doesn't matter what format you are shooting on... the lighting principles are all the same. You light for DV and HD just as you would for 35mm Film.
 Even though most of Tom's experience is in production work, he breaks down the complexity of lighting to the point where it can be used in the fast pace of modern television news. Even though most of Tom's experience is in production work, he breaks down the complexity of lighting to the point where it can be used in the fast pace of modern television news.
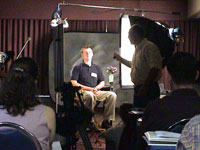
The class was broken down into 3 hours of "classroom" instruction, followed by 4 hours of hands-on examples lighting interviews and product set-ups. The basic principles of the classroom instruction included:
- Lighting should be SOFT, SOFT, SOFT. Diffuse the light... and then diffuse it again. Soft light, like that of a Chimera soft box or an umbrella, gives nice quality lighting and compliments the subject. The further the diffusion is from the lamp, the softer the light quality. Also, the larger the soft box, the softer the light. If placed properly, the light "wraps" around the subject in a very appealing way. The power of the light dictates how far you can pull the light from the subject and still have this "wrap."
- The power of lights brought on a discussion of "stops." While the f-stop is the measurement of the opening of the iris, the amount of light let in DOUBLES with each stop. This doubling (or halving) of light with each stop becomes the basic measurement of photography. Light fixtures increase in wattage in a way that doubles their light level. Basic wattage include 100, 200, 300, 650, 1000, 2000, 4K, 10k and so on...
- Many variable of the camera affect the image in roughly 1 Stop increments. Speeding up the shutter speed lose a stop with each adjustment, while raising the gain adds a stop every 6db factor. Daylight filter adjustments without ND lose about 2/3rds of a stop.
- The optimum iris setting is between f/4 and 4/5.6. This gives the best depth of field without showing the imperfections of the lens. It allows for a very sharp subject with a nice soft background. In a controlled lighting situation you should build your lighting around f/4.
The Hands-On section of the class allowed us to see real world examples of lighting. A volunteer from the class sat in as the subject and Tom lit him as he normally would. The KEY light, or primary light should be on the same side that the subject is looking. This was a soft box light put through a diffuser.
The FILL light was simply a white card bouncing the KEY light on the other side of the subject face. This fills in the shadows without losing the shape of the face. If the FILL light is too bright, it creates an even 1:1 light ratio with the KEY, thus giving a very flat lighting. Having a darker fill, allowing for a little bit of shadow, creates drama.
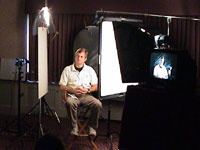 The BACK light (or hair light) should be used to separate the subject from its background. A subtle hair light placed behind and above the subject's head puts a nice "halo" around the subject's hair... but should be only used if the subject has hair. The reflection of this light on a bald head is not attractive. For those individuals, block of the light on the head and shine it more on the shoulders. The BACK light (or hair light) should be used to separate the subject from its background. A subtle hair light placed behind and above the subject's head puts a nice "halo" around the subject's hair... but should be only used if the subject has hair. The reflection of this light on a bald head is not attractive. For those individuals, block of the light on the head and shine it more on the shoulders.
The background should be lit to compliment the subject, but not take away from it. Tom uses what he calls a RAKE. This is a light, with some textured pattern in front of it, creating an interesting shadow on the background.
With three basic lights, and a reflecting card, Tom was able to light an interview subject beautifully. It was a lighting job that would rival anything 60 minutes has done. Lighting that is smooth, quiet and interesting, all at the same time.
|
